Disclosure: SPOTIO is our product and appears at the top of this list. We’ve applied the same evaluation criteria — G2 ratings, feature depth, and field sales use case fit — to every tool, including our own.
Your reps are spending hours chasing down contacts that go nowhere. They’re working from prospect lists that are six months stale. And when a rep finally gets in front of someone, they have no context on the account — no recent activity, no buying signals, no sense of whether this is a good use of drive time.
That’s the intelligence problem field teams face. Most sales intelligence platforms were built for desk-bound SDRs dialing through a list. They’re excellent at finding email addresses and sequencing follow-ups. But your reps are in a truck between appointments, knocking on a door in a new neighborhood, or trying to figure out which accounts in their territory are worth a visit this week. They need tools that work in the field — not tools that assume they’re at a desk.
AI has changed what “intelligence” means. The best platforms now surface buying signals before a prospect fills out a form, predict which accounts are most likely to close, and — in the case of field-specific tools — give reps instant account briefs between stops instead of making them dig through notes. But AI features vary wildly in how useful they actually are in the field. An AI that drafts emails from a desk is different from an AI co-pilot that helps a rep prep for the next door knock while driving. That distinction matters when you’re evaluating platforms.
The sales intelligence market hit $4.99 billion in 2026 and is growing at nearly 13% annually. There are now 385+ platforms on G2 alone. This guide cuts through the noise. We evaluated the leading solutions based on G2 ratings, review volume, field sales use case fit, mobile functionality, and integration depth — and ranked them with an honest look at who each tool actually serves.
Our Evaluation Criteria
We evaluated these 10 tools based on four criteria: feature depth for field sales use cases (territory management, prospect filtering, offline functionality), third-party G2 ratings with a minimum of 50 reviews, integration compatibility with major CRM stacks, and pricing transparency.
Tools were grouped by function to reflect how field teams actually build their stacks — field execution platforms, enterprise contact databases, ABM intent tools, and specialist enrichment tools.
We also excluded CRMs with basic contact features and single-purpose email finders (Hunter.io, Snov.io) to keep the focus on comprehensive intelligence platforms. Where our own product is included, it has been evaluated against the same criteria.
What Sales Intelligence Actually Does
Sales intelligence platforms give you data you can act on — contact info, company insights, intent signals, and territory breakdowns. The difference between a basic contact database and real intelligence is knowing who to call, when to call them, and what they care about.
That distinction matters even more in field sales. An inside rep can run 80 dials in a day and course-correct quickly. A field rep has a fixed number of stops. Bad intelligence doesn’t just waste time — it wastes fuel, miles, and the one conversation that could have happened if the rep had gone somewhere else.
The right platform also has to work in the field: offline access when you’re in a dead zone, mobile-first design when you’re logging from a truck, and territory visibility so reps aren’t prospecting in someone else’s zone.
Sales Intelligence Features to Look For
Not every platform delivers the same value for field teams. Here’s what separates useful from wasteful:
- Data accuracy and freshness — Outdated contacts waste drive time and door knocks, not just calls
- Mobile and offline access — Your reps can’t wait for WiFi at a job site; look for platforms with offline functionality that sync when connectivity returns
- CRM integration — Two-way sync so field activity flows back to your CRM without manual entry
- Territory management — See which accounts fall in which rep’s zone and catch coverage gaps before they become lost revenue
- Intent signals — Know which accounts are actively researching solutions like yours so reps prioritize the right stops
Top Sales Intelligence Tools for 2026
1. SPOTIO
Best For: Field sales teams managing territories and tracking face-to-face activities
G2 Rating: 4.5/5 (387 reviews)
SPOTIO is the only sales intelligence platform built specifically for outside sales. While every other tool on this list was designed for desk-based SDRs, SPOTIO was built from the ground up for reps who work territories, drive between accounts, and need their tools to function at a job site with no cell signal.
The core difference: SPOTIO combines prospect filtering, territory management, and activity tracking in one system. Other tools stop at finding the contact. SPOTIO gets your rep to the door — and captures what happened when they got there.
Pricing: Custom pricing based on team size and features; 5-user minimum
Key Capabilities:
- Prospect Filtering: Tap businesses on a map to pull contact info from Google Places for B2B prospects, or filter residential leads through Lead Machine using 15 data points — income level, homeownership, household size, and more
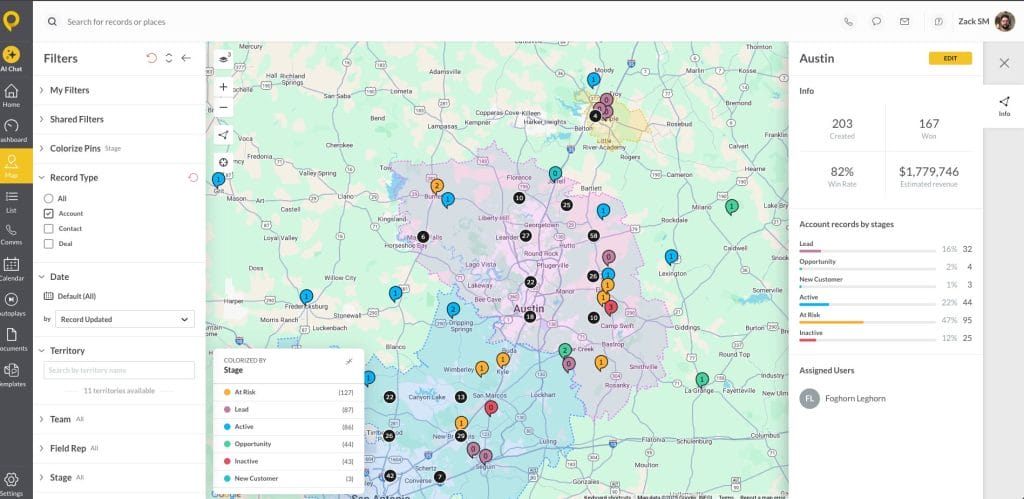
- Territory Management: Assign accounts to reps, balance workloads, and visualize coverage gaps on a map so you can fix territory assignments before they cost you revenue
- Location-Verified Activities: GPS coordinates attach to every logged activity — reps tap to log, and the system captures the location — so you know visits actually happened
- Route Planning: Build optimal routes in SPOTIO, then hand off to Google Maps or Waze for turn-by-turn navigation
- AutoPlays: Manually enroll prospects in guided follow-up sequences that show reps exactly what action to take next, eliminating dropped follow-ups
- DASH AI Co-Pilot: On-demand AI that answers product questions, pulls 10-second account briefs before a visit, and drafts emails and texts for rep review — every action shows a confirmation preview before writing to SPOTIO. Human-in-the-loop by design, not an afterthought
- Download My Day: Pre-download specific areas for offline access up to 24 hours when working in coverage gaps
- Performance Dashboards: Visualize sales metrics at the rep and team level to see what’s actually happening in the field
✅ What we like: Built for field teams from day one — territory management, offline mode, and location-verified activity logging work together in a way no other platform matches; mobile app designed for use between stops, not at a desk
⚠️ Watch out for: 5-user minimum is a real barrier for micro-teams; reporting skews toward activity inputs vs. closed revenue outputs
User review: “Excellent lead generator and field management tool! SPOTIO assists me in finding new leads near my existing appointments, which is extremely helpful. This allows me to make the most of my time and effort, maximizing my sales opportunities.” — Verified G2 review
2. ZoomInfo GTM Workspace
Best For: Enterprise B2B teams targeting large accounts with deep contact databases and intent data
G2 Rating: 4.5/5 (9,005+ reviews)
ZoomInfo is the enterprise standard for B2B contact data. Its 321M+ contact database, combined with acquisition of Bombora’s full intent feed, gives demand gen teams a comprehensive view of who’s in-market right now. The platform shines for inside sales and ABM teams running high-volume, multi-channel outbound.
For field teams, ZoomInfo works best as a complement to SPOTIO — not a replacement. It has no territory management, no mobile-first field experience, and no location-verified activity tracking. Larger field organizations (100+ reps) sometimes pair ZoomInfo with SPOTIO when they need deeper organizational charts and Fortune 500 account coverage beyond what SPOTIO’s Google Places integration provides.
Pricing: Custom; enterprise contracts typically start at $15,000/year and climb to $30K–$80K+ for mid-market deployments
Key Capabilities:
- Contact Database: 321M+ business contacts with direct dials, verified emails, and global company data
- Intent Data: Bombora-powered and proprietary signals showing which accounts are actively researching your solution
- Organizational Charts: Full stakeholder mapping so you know everyone involved in a buying decision
- CRM Enrichment: Auto-populate missing contact and company data in Salesforce or HubSpot
- Conversation Intelligence: Record and analyze sales calls to identify coaching opportunities and winning talk tracks
✅ What we like: Unmatched enterprise contact depth; intent data is best-in-class for multi-channel ABM; Gartner Magic Quadrant Leader for ABM platforms
⚠️ Watch out for: Notoriously rigid contract terms — annual lock-ins, aggressive auto-renewals, and steep pricing are consistent complaints in G2 reviews; no field sales features; mobile functionality is limited
User review: “ZoomInfo solves the problem of fragmented prospect intelligence. Instead of jumping between multiple sites, I can see a company’s budgetary details, tech stack, and org hierarchy on a single page. It also solves the “gatekeeper” issue by providing verified direct dials and mobile numbers, ensuring I can actually reach the people I find.” — Verified G2 review
3. Apollo.io
Best For: Teams wanting prospecting, sequencing, and analytics in one affordable platform
G2 Rating: 4.7/5 (9,650+ reviews)
Apollo.io combines a 275M+ contact database with built-in email sequencing, a dialer, and performance analytics at a fraction of ZoomInfo’s price. It’s the top choice for fast-growing B2B companies that need real prospecting power without a six-figure contract. High review volume and consistently strong satisfaction scores reflect real adoption at scale.
Field teams occasionally use Apollo for pre-call research and list building before deploying SPOTIO for territory execution. Apollo’s strength stops at the desk — no territory management, no mobile field experience.
Pricing: Free plan available; paid plans from $49/user/month
Key Capabilities:
- Contact Database: 275M+ contacts and 73M+ companies with filtering by tech stack, revenue, employee count, funding stage, and job function
- Email Sequences: Automated multi-touch campaigns with A/B testing and reply-rate tracking
- AI Lead Scoring: Machine learning models rank prospects by conversion likelihood and engagement signals
- Dialer Integration: Click-to-call from the platform with local presence dialing and call recording
- Analytics Dashboard: Track email performance, meetings booked, and pipeline generated by rep and campaign
✅ What we like: Best value-for-features ratio in the market; clean interface with high G2 ease-of-use scores; strong SMB and mid-market contact coverage
⚠️ Watch out for: Enterprise contact accuracy (10,000+ employee companies) noticeably weaker than ZoomInfo; no field sales capabilities; phone coverage for senior executives is inconsistent
User review: “Apollo.io is a powerhouse for outbound sales, bringing data intelligence and multi-channel sequencing together in a single tool. The UI/UX feels clean and intuitive, and the Chrome extension is especially strong—it lets me source verified leads directly from LinkedIn without any manual data entry.” — Verified G2 review
4. LinkedIn Sales Navigator
Best For: Relationship-focused sellers targeting specific decision-makers through social selling
G2 Rating: 4.4/5 (2,190+ reviews)
LinkedIn Sales Navigator leverages the world’s largest professional network for B2B prospecting. Advanced search filters surface decision-makers by role, seniority, company size, and industry. The platform excels when relationship-building and warm introductions drive your sales motion — it’s the go-to for B2B sellers who close on trust and referrals.
It’s not a field intelligence tool. No territory management, no location features, no offline access. But field reps selling into enterprise accounts often use Sales Navigator to map stakeholders and establish warm connections before the in-person visit.
Pricing: Core from $99/user/month; Advanced from $179/user/month
Key Capabilities:
- Advanced Lead Search: Filter 900M+ LinkedIn members by job title, seniority, company growth signals, and technologies used
- Account Mapping: See all connections between your team and target accounts to find warm introduction paths
- Real-Time Alerts: Get notified when prospects change jobs, post content, or mention relevant topics
- InMail Messaging: Reach prospects directly even without an existing connection
- CRM Sync: Push leads and account data to Salesforce or other CRMs
✅ What we like: Unparalleled access to professional relationship data; warm introduction paths improve field rep cold-call conversion; real-time job change alerts let field teams re-engage warm relationships
⚠️ Watch out for: InMail credit limits create friction for high-volume prospecting; data reflects LinkedIn profiles, not verified contact databases; no territory or field mobility features
User review: “LinkedIn Sales Navigator solves the core problems of inefficient B2B prospecting, difficulty reaching decision-makers, and lack of real-time buyer intelligence. It has enabled me to identify high-fit prospects, monitor buying signals, and initiate personalized outreach” — Verified G2 review.
5. Cognism
Best For: Teams prospecting in European markets requiring GDPR-compliant, phone-verified contact data
G2 Rating: 4.5/5 (1,330 reviews)
Cognism’s core differentiator is Diamond Data® — mobile phone numbers manually verified through human calls, not just database cross-checks. European-focused SDR teams report dramatically higher connect rates on UK and DACH outbound after switching from competitors. For teams operating in EMEA markets, Cognism’s compliance-first approach eliminates the legal risk that ZoomInfo and Apollo carry in European prospecting.
The tradeoff: it’s built for inside sales phone outreach, not field execution. No territory management, no field mobility features, and US data quality trails European coverage.
Pricing: Annual-only; platform fee plus per-seat structure; typical mid-market contracts start at $15,000/year
Key Capabilities:
- Diamond Data® Phone Numbers: Manually verified cell numbers with industry-leading EU connect rates — 60–75% match rates on European mobile data vs. ~30% for Apollo and ~50% for ZoomInfo
- GDPR-Compliant Data: Notified individuals, DNC-screened numbers, and DPA-ready contracts for compliant European prospecting
- Real-Time Validation: Contact data verified at pull time, not stored as static database entries
- Bombora Intent Integration: Third-party buying signal data showing active in-market accounts
- Chrome Extension: Pull contact data directly from LinkedIn profiles while prospecting
✅ What we like: Best GDPR compliance infrastructure in the market; Diamond Data connect rates materially outperform competitors for EU outbound; unlimited data exports unlike credit-capped alternatives
⚠️ Watch out for: Premium pricing justified primarily by EU data quality — US-only teams rarely see ROI vs. Apollo; no free trial; platform fee makes it unworkable for small teams
User review: “I like the user interface of Cognism. It’s very simple and intuitive, making it easy to navigate. The database is really good, especially for phone numbers and email addresses in the EMEA/EU regions. “ — Verified G2 review
6. Seamless (Formerly Seamless.AI)
Best For: Inside sales teams needing high-volume real-time contact verification with unlimited search
G2 Rating: 4.4/5 (5,330+ reviews)
Seamless uses AI-powered search to find and verify contact information in real time rather than pulling from a static database. Higher-tier plans offer unlimited search credits — a key differentiator for teams that exhaust credits on Apollo or Lusha. The Chrome extension makes it easy to prospect directly from LinkedIn without switching tools.
Field sales applicability is limited: no territory management, no mobile-first design for field use, no offline functionality.
Pricing: Free tier available; paid plans from $147/user/month
Key Capabilities:
- Real-Time Verification: AI validates emails and phone numbers at the moment of request, not from stored data
- Unlimited Search: Higher-tier plans eliminate per-contact fees and credit limits
- Chrome Extension: Find and verify contacts directly from LinkedIn, company websites, or other pages
- Lead Builder: Create targeted prospect lists using 40+ filters including job title, company size, industry, and location
- Autopilot Prospecting: Automated list-building based on ICP criteria for continuous pipeline fill
✅ What we like: Real-time verification produces fresher data than database-first competitors; unlimited credits on premium plans suit high-volume inside sales; strong G2 satisfaction scores
⚠️ Watch out for: Credit-based free and lower-tier plans run out quickly — a consistent complaint in G2 and Capterra reviews; no field sales features; GDPR compliance is limited vs. Cognism
User review from G2/Capterra: “AI search and buyer intent filters have become really useful for finding the right prospects faster. Sometimes smaller or newer companies still have missing or outdated contact details. Very few free credits and no free trials available.” — Verified Capterra review
7. 6sense Sales Intelligence
Best For: Enterprise account-based sales teams using predictive analytics to prioritize in-market accounts
G2 Rating: 4.0/5 (940+ reviews)
6sense uses AI to identify which accounts are in-market before competitors reach them. It analyzes anonymous web traffic, content consumption, and keyword research to predict buying stage. Named a Forrester Wave Leader for Revenue Marketing Platforms in Q1 2026, 6sense is the platform of choice for large ABM teams that need to focus expensive sales resources on the highest-probability accounts.
It’s the most specialized tool on this list — and the furthest from field sales execution. No territory management, no mobility features, no prospect discovery from scratch.
Pricing: Free tier available (50 data credits/month); enterprise pricing custom
Key Capabilities:
- Predictive Analytics: AI models score accounts by buying stage and intent signals to prioritize outreach timing
- Anonymous Visitor Identification: Unmask companies researching your solution without form fills
- Account-Based Orchestration: Coordinate sales and marketing actions based on account engagement data
- Third-Party Intent Data: Native Bombora and G2 intent integrations for comprehensive buying behavior signals
- Revenue AI: Next-best-action recommendations based on historical win patterns
✅ What we like: Best-in-class predictive intent scoring for enterprise ABM; Salesforce, Marketo, and Outreach integrations are consistently strong per G2 reviews
⚠️ Watch out for: Intent signals can feel opaque — not always clear why an account is flagged as in-market; steep enterprise pricing; only pays off if you already have a real ABM motion running — no value for teams still building pipeline from scratch
User review from G2: “What I like best about 6sense Sales Intelligence is how clearly it surfaces in-market accounts and buying intent. It helps me prioritize the right prospects at the right time rather than working broad, low-signal lists.” — Verified G2 review
8. Lusha
Best For: Small to mid-sized inside sales teams needing fast contact enrichment with accurate phone numbers
G2 Rating: 4.3/5 (1,650+ reviews)
Lusha specializes in fast contact discovery with strong phone number accuracy. The browser extension lets reps pull verified contact data directly from LinkedIn profiles and company websites in one click. It’s popular with SMBs and individual sellers who need reliable contact info without enterprise complexity or a five-figure contract.
No field sales features — no territory management, no mobile-first design, no offline access.
Pricing: Free tier (5 credits/month); paid plans from $36/user/month; Enterprise pricing custom
Key Capabilities:
- Browser Extension: One-click contact enrichment directly from LinkedIn and company websites
- Direct Dial Accuracy: Strong phone number verification with A+ rated contacts showing higher connect rates
- Job Change Alerts: Re-engage warm relationships when prospects change companies or roles
- CRM Integration: Auto-sync contacts to Salesforce, HubSpot, or Pipedrive with full enrichment data
- API Access: Programmatic contact database access for bulk enrichment workflows
✅ What we like: Most transparent pricing in the contact data category — no hidden fees; free tier makes it easy to evaluate before committing; fast, low-friction Chrome extension workflow
⚠️ Watch out for: Smaller verified database than enterprise competitors; US data quality is stronger than international coverage; limited support responsiveness vs. premium-priced alternatives
User review: “Lusha solves the problem of finding accurate and verified B2B contact data quickly, which reduces the time spent on manual research and prospecting. It helps me connect with the right decision-makers faster, improve outreach efficiency, and maintain cleaner CRM records through enrichment and integrations.” — Verified G2 review
9. Leadfeeder by Dealfront
Best For: Inbound sales and marketing teams identifying anonymous website visitors
G2 Rating: 4.3/5 (860+ reviews)
Leadfeeder by Dealfront tracks which companies visit your website, what content they consume, and how long they engage. It turns anonymous traffic into qualified leads by matching IP addresses to company data. This is a fundamentally different intelligence model — not prospecting from scratch, but surfacing companies already showing interest in you.
Best suited for teams with significant inbound web traffic. No value for field teams without that traffic base, and no field-specific functionality.
Pricing: Free plan available (limited to last 7 days of data); paid plans from $99/month
Key Capabilities:
- Website Visitor Identification: See which companies browse your site, which pages they view, and for how long
- Buyer Intent Signals: Repeat visits, pricing page views, and content downloads indicate purchase intent
- Custom Feed Filtering: Set alerts for high-value accounts or specific behavioral patterns worth immediate outreach
- CRM Integration: Push qualified visitor data directly to your CRM with full engagement history
- Lead Scoring: Rank visitors by company fit, engagement level, and buying signals
✅ What we like: Unique inbound intelligence angle — surfaces buying intent without active prospecting effort; straightforward setup with strong CRM integrations
⚠️ Watch out for: Only as good as your inbound traffic — no traffic means no intelligence; company-level identification only, not contact-level; no field sales functionality
User review from G2: “We primarily use this tool to track website visitors, identify their sources, and pinpoint key individuals from their companies. By integrating HubSpot forms to capture leads, and combining that with Dealfront, we gain deeper insights into both the companies and their key contacts.” — Verified G2 review
10. D&B Hoovers
Best For: Enterprise teams needing deep firmographic data and company financial intelligence
G2 Rating: 4.1/5 (780+ reviews)
D&B Hoovers leverages Dun & Bradstreet’s global database for deep company intelligence — financial health scores, corporate family trees, and firmographic data refreshed thousands of times daily. The D-U-N-S number anchoring makes company data unusually reliable, especially for enterprise teams prospecting into complex multi-entity organizations.
Know both sides before signing: G2 reviews consistently praise firmographic accuracy. Trustpilot reviews tell a different story, with a 1.1/5 score driven by billing surprises and renewal pricing — and D&B settled with the FTC in 2022 over renewal-pricing misrepresentation.
Pricing: Essentials from $49/month; enterprise from $25,000/year
Key Capabilities:
- Commercial Database: 330M+ business records with verified firmographic data anchored to D-U-N-S numbers
- Financial Health Scores: Assess company stability and creditworthiness before investing sales resources
- Trigger Alerts: Notifications on funding rounds, leadership changes, expansions, and other buying signals
- Corporate Family Trees: Map parent companies, subsidiaries, and affiliated entities for complex account structures
- SWOT Analysis: Pre-built competitive intelligence reports for target accounts
✅ What we like: Best-in-class firmographic data reliability; financial health scoring is genuinely differentiated for enterprise sales into regulated industries
⚠️ Watch out for: Strong G2 product scores but a 1.1/5 Trustpilot score driven by billing and renewal complaints; the 2022 FTC settlement over renewal-pricing misrepresentation is worth knowing before you sign; contact data quality trails enterprise-focused competitors
User review from G2: “D&B Hoovers helps verify whether a customer really exists and if the information they provide during registration is correct. It allows me to confirm that the Tax ID belongs to the right company and to check the legal address. I can also see relationships between companies if they exist. This reduces risk and helps ensure our data is accurate.” — Verified G2 review
Sales Intelligence Tools Comparison
The table below breaks down how these platforms stack up across key decision factors:
| Tool | Best For | Field Sales Fit | Mobile App | Territory Features | G2 Rating |
|---|---|---|---|---|---|
| SPOTIO | Field sales execution | ✅ Built for field teams | ✅ Full mobile app | ✅ Territory mapping & assignment | 4.5/5 (387) |
| ZoomInfo | Enterprise B2B | ⚠️ Contact data only | Limited | ❌ No territory tools | 4.5/5 (9,005+) |
| Apollo.io | Budget-conscious teams | ⚠️ Pre-call research only | Limited | ❌ No territory tools | 4.8/5 (7,142+) |
| LinkedIn Sales Navigator | Social selling | ⚠️ Stakeholder mapping only | ✅ Mobile app | ❌ No territory tools | 4.3/5 (1,854+) |
| Cognism | European GDPR markets | ⚠️ Contact data only | Limited | ❌ No territory tools | 4.5/5 (1,303) |
| Seamless.AI | High-volume inside sales | ⚠️ Contact data only | Limited | ❌ No territory tools | 4.4/5 (5,285) |
| 6sense | Enterprise ABM intent | ❌ Not suited | Limited | ❌ No territory tools | 4.4/5 (1,028+) |
| Lusha | SMB contact enrichment | ⚠️ Contact data only | Browser extension | ❌ No territory tools | 4.3/5 (1,613) |
| Dealfront | Inbound visitor tracking | ❌ Not suited | Dashboard only | ❌ No territory tools | 4.5/5 |
| D&B Hoovers | Enterprise firmographics | ⚠️ Company data only | Dashboard only | ❌ No territory tools | 4.1/5 (790) |
Stacking Intelligence Tools for Field Sales
If you have fewer than 50 reps, SPOTIO is typically your complete sales intelligence and execution platform. Google Places handles B2B contact discovery, Lead Machine filters residential prospects with 15 data points, and territory management keeps reps working the right zones. Adding a second platform before you’ve used SPOTIO’s capabilities adds cost and complexity without proportional return.
If you have 100+ field reps targeting enterprise accounts, there’s a case for layering ZoomInfo or Apollo on top of SPOTIO for deeper organizational charts and expanded Fortune 500 contact coverage. This typically adds $150–200+ per user monthly — only evaluate it after your team has exhausted SPOTIO’s built-in prospect filtering.
If you’re running both a field team and an inside sales team, the stacks diverge. Inside reps may benefit from Apollo’s sequencing or ZoomInfo’s high-volume contact data. Field reps need SPOTIO. Trying to force one tool to serve both motions usually means it serves neither well.
How to Choose the Right Sales Intelligence Tool
Match the Tool to Your Sales Motion
Inside sales and field sales need fundamentally different capabilities. If your reps work from desks making 100 calls a day, ZoomInfo or Apollo give you massive contact databases and sequencing. If they’re covering territories face-to-face, you need mobile access, territory management, and location-verified activity tracking — capabilities only field-focused platforms provide.
Check CRM Integration Depth
Your intelligence tool should sync two ways with your CRM — field activity flows back to the record, and CRM data surfaces in the field app. For field teams, verify that the tool connects with your territory management and activity tracking workflows, not just your contact database.
Ask the Hard Questions About Data Quality
Database size means nothing if contacts are outdated. Before signing: How often do they refresh contact data? What’s their geographic coverage in your target markets? How do they handle GDPR and CCPA compliance? What’s the typical email bounce rate on purchased lists?
Know the Real Total Cost
The license fee is what vendors lead with. Onboarding, data add-ons, integration development, and seat minimums are where the real number lives. For field teams, cost reality check: stacking SPOTIO with ZoomInfo runs $200–300+ per user monthly. Most field teams under 50 reps find SPOTIO’s built-in prospect filtering makes that stack unnecessary.
Small Team Reality Check
If you have fewer than 5 reps or sell to under 100 total accounts, enterprise sales intelligence may be overkill. Start with a simple CRM and graduate to intelligence platforms when prospecting volume justifies the investment.
Implementation: The First 90 Days
Weeks 1–2: Foundation Setup
Start with your CRM integration. Connect your intelligence platform so field activity flows automatically — no manual exports. For field teams, define territories before importing contacts. Teams that skip this step waste weeks with reps prospecting outside their assigned zones or duplicating each other’s work.
Weeks 3–4: Pilot Group Rollout
Find the reps who’ll actually use it and start there — 3 to 5 people who can give you honest daily feedback. Train them thoroughly on the core workflows: finding prospects, one-tap activity logging, and syncing back to your CRM. For field teams, spend extra time on mobile features — offline mode and route planning. Fix friction points before you roll out company-wide.
Months 2–3: Optimization
Track what matters: contacts added, activities logged, pipeline created, time saved on prospecting. Correlate tool usage with results — the reps using it most should show measurable output differences. Introduce advanced features gradually: AutoPlay sequences, territory heat maps, intent data filters. Use actual coverage data from the tool to refine territory assignments for the next quarter.
Frequently Asked Questions
Your CRM stores relationship data — contacts, deals, and activities you’ve already logged. Sales intelligence finds new prospects you haven’t met yet and enriches existing records with fresh contact changes, buying signals, and company data. Most field teams need both: a CRM as the record-keeper and an intelligence platform to fill the top of the funnel.
Pricing varies widely by platform and team size. Entry-level tools like Lusha start at $36/user/month with a free tier available. Mid-tier platforms like Apollo start at $49/user/month. Enterprise solutions like ZoomInfo and Cognism require custom quotes starting at $15,000+/year. Field-specific platforms like SPOTIO use custom pricing based on team size and feature set.
Most platforms were built for inside sales and lack field-specific capabilities: no mobile offline access, no territory mapping, no location-verified activity tracking. SPOTIO is purpose-built for field teams, combining prospect discovery, territory management, and execution in one system. Larger enterprises (100+ field reps) sometimes pair SPOTIO with ZoomInfo for expanded enterprise contact coverage, but most field teams find SPOTIO’s built-in capabilities sufficient.
AI shows up differently depending on what the platform was built to do. For contact databases like ZoomInfo and Apollo, AI powers enrichment — matching fragmented data points into clean records and flagging accounts showing intent based on web activity. For ABM platforms like 6sense, AI builds predictive models that score accounts by buying stage. For field execution platforms like SPOTIO, AI works as a co-pilot between stops — giving reps instant account briefs, logging updates with a voice-to-tap workflow, and drafting follow-up messages for rep review before anything gets sent. The key question for field teams: does the AI require you to be at a desk? If yes, it won’t help your reps in the field.
Basic CRM integration and data import takes 1–2 weeks. Getting a team trained and consistently using the platform takes 4–6 weeks. Full optimization — refined territory assignments, advanced workflows, and adoption metrics — typically takes 2–3 months. Field implementations run slightly longer due to territory setup and mobile deployment across a distributed team.
Teams using sales intelligence consistently report productivity gains within the first 90 days from reduced prospecting time and better account targeting. Field teams benefit specifically from improved territory coverage and fewer wasted stops. The biggest driver is usually the combination of better prospect filtering — fewer dead-end visits — and faster activity logging — less admin time after each stop.
For most field teams under 50 reps, SPOTIO is the complete intelligence and execution platform. Google Places handles B2B contact discovery, Lead Machine filters residential prospects, and territory management keeps reps focused on their zones. Evaluate a second platform only after your team has fully adopted SPOTIO and genuinely exhausted its built-in prospecting capabilities.
GDPR applies to any contact data involving EU residents, regardless of where your company is based. CCPA covers California residents. Most enterprise platforms claim compliance, but depth varies significantly — Cognism has the most rigorous GDPR infrastructure for EU prospecting. Always verify compliance documentation before purchasing contact data for European markets.
Get Field Sales Intelligence That Actually Works
Most intelligence platforms stop at the data. Field teams need what comes next — territory visibility, mobile access, and proof that reps are working the right accounts in the right zones.
SPOTIO combines sales intelligence with field execution in one platform. Find prospects through 15-point Lead Machine filtering or Google Places for B2B, assign them to territories that make geographic sense, and capture location-verified activities as your team works the field.
Ready to see how it works for a team like yours? Request a demo and we’ll show you exactly how SPOTIO fits your field sales operation.